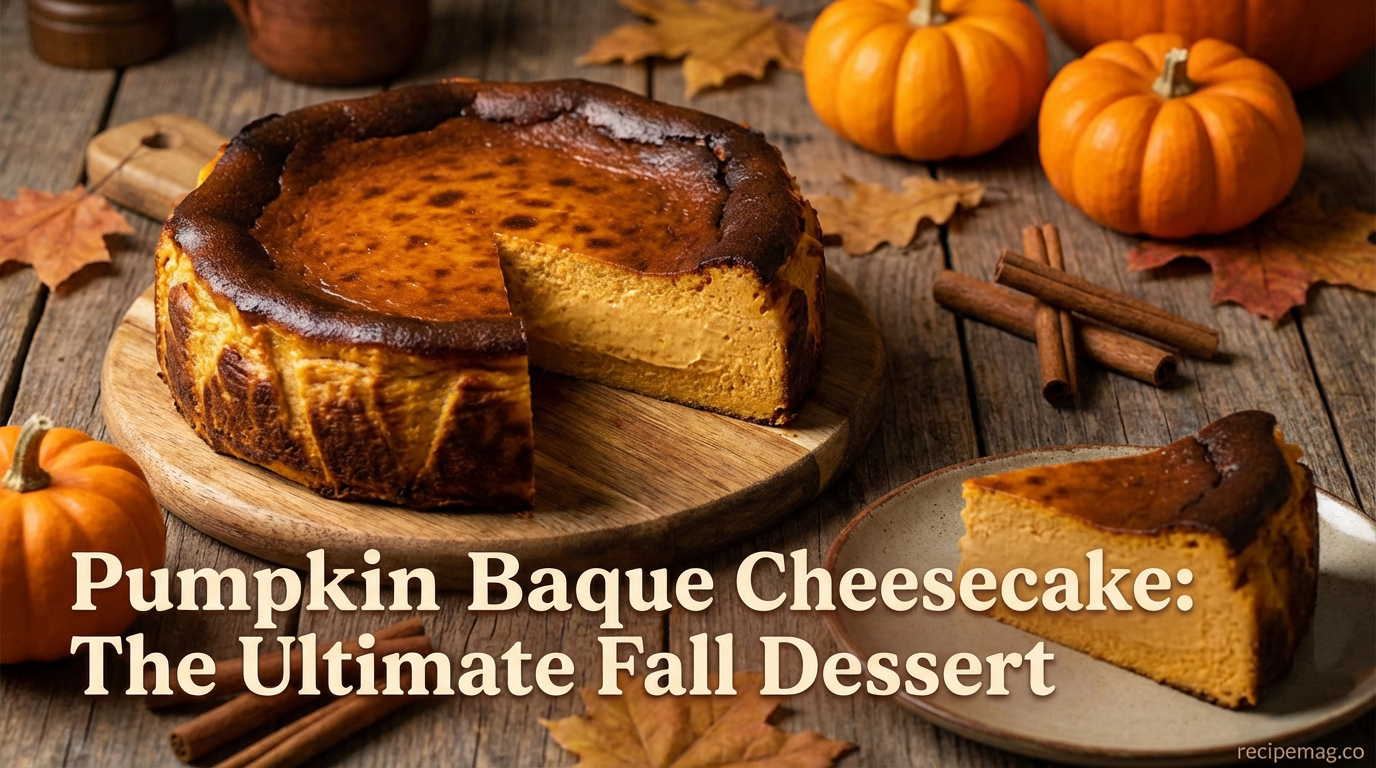
Imagine taking the deeply caramelized, rustic charm of a classic Spanish dessert and infusing it with the warm, comforting spices of autumn. That is exactly what you get when you bake a stunning pumpkin basque cheesecake in your own kitchen. This incredible hybrid dessert brings together rich cream cheese, earthy squash, and a deliberately scorched top. It is the perfect marriage of sophisticated flavor and effortless preparation.
Unlike classic New York-style recipes, this cake intentionally shuns perfection. There are no finicky water baths to prepare or sudden temperature drops to manage. You will not experience any stress over a cracked surface ruining your presentation. The true beauty of this dessert lies in its beautifully wrinkled edges and deeply toasted top layer.
In this comprehensive guide, you will learn exactly how to master this stunning seasonal showstopper. We will cover the best ingredients, foolproof mixing techniques, and the secret to achieving that signature gooey center. Get ready to transform your autumn baking routine with a dessert that looks elegant but is surprisingly simple to make.
What Makes a Pumpkin Basque Cheesecake Special
The Magic of the Burnt Exterior
The signature feature of any Basque-style bake is its dramatically dark, caramelized crust. This is achieved by baking the batter at an unusually high temperature, usually around 400°F (200°C) or higher. The intense heat causes the sugars on the surface to undergo the Maillard reaction rapidly. This is what creates that striking, dark brown canopy.
This rapid caramelization process creates a deeply complex flavor profile that hints at toasted caramel and roasted sugar. The slight bitterness of the crust perfectly balances the rich, sweet interior of the custard. It is this beautiful contrast of bitter and sweet that elevates the dessert beyond a standard seasonal treat.
Many first-time bakers panic when they see the top of their cake turning nearly black in the oven. However, that dark exterior acts as a protective shield for the delicate batter underneath. It seals in the moisture while imparting a smoky, molasses-like flavor that defines the entire dish.
Fall Flavors in a Creamy Center
When you slice through the dark, wrinkled exterior, the center of the cake should be incredibly soft and custardy. Adding pumpkin puree to the mix makes the texture even more velvety than a standard cream cheese recipe. The natural moisture in the squash helps prevent the center from drying out during the intense, high-heat bake.
A delicate blend of cinnamon, ginger, nutmeg, and cloves enhances the earthy sweetness of the puree. These autumnal spices mingle perfectly with the tangy, rich profile of the cream cheese base. Every bite feels like a warm, comforting hug on a crisp autumn evening.
The contrast in textures is truly where this dessert shines brightest. You get the slightly chewy, caramelized outer edges giving way to a center that almost mimics the consistency of pudding. This dynamic mouthfeel keeps your palate engaged from the first bite to the last crumb.
Why It Defeats Traditional Cheesecakes
Traditional cheesecakes can be incredibly intimidating for home bakers of all skill levels. They require gentle baking, precise hot water baths, and hours of gradual cooling to prevent the dreaded surface crack. A pumpkin basque cheesecake completely throws those rigid baking rules out the window.
Because you actively want the top to blister, puff up, and eventually collapse, cracking is simply a non-issue. The rustic, imperfect appearance is actually the main aesthetic goal, making the baking process incredibly forgiving. Even complete beginner bakers can produce a stunning dessert that looks like it came from a professional European bakery.
Furthermore, the preparation time is significantly shorter than standard recipes. You do not have to spend time crushing graham crackers or pre-baking a crust. The batter comes together in one single bowl, making cleanup a breeze for busy holiday hosts.
Essential Ingredients for the Perfect Bake
Choosing the Right Cream Cheese
The absolute foundation of any great cheesecake is high-quality, full-fat cream cheese. You must use the dense, block-style cream cheese rather than the whipped variety sold in plastic tubs. Whipped cream cheese contains far too much air and will ruin the dense, creamy texture you want to achieve.
Make sure your cream cheese is completely at room temperature before you even begin mixing. Cold cream cheese will stubbornly hold onto lumps, resulting in an unappealing, speckled batter. Leave the foil-wrapped blocks on your kitchen counter for at least two to three hours prior to baking.
Using a premium brand of cream cheese can also make a noticeable difference in the final product. Generic brands sometimes contain higher water content, which can make your final custard slightly runny. Investing in a quality, full-fat block ensures maximum richness and stability in your dessert.
Pumpkin Puree vs Pumpkin Pie Filling
It is absolutely crucial to use 100% pure pumpkin puree for this particular recipe. Canned pumpkin pie filling comes pre-sweetened and loaded with artificial spices that will completely throw off your recipe’s delicate balance. Pure puree allows you, the baker, to control exactly how much sugar and spice goes into your mixing bowl.
If your brand of pure puree looks exceptionally watery when opened, you can blot it gently. Simply spread the puree on a plate and lightly dab it with paper towels to absorb excess moisture before adding it to the bowl. Removing a bit of that excess liquid ensures the cheesecake sets properly in the center.
This simple blotting step concentrates the natural squash flavor beautifully. It also prevents the batter from becoming too thin, which is vital for maintaining the structural integrity of a crustless cake. You want the earthy essence of the squash to shine without watering down the cream cheese.
Spices That Elevate the Flavor Profile
A stellar seasonal dessert relies heavily on the quality and balance of its spice blend. While a pre-mixed pumpkin pie spice is convenient in a pinch, mixing your own spices yields a much brighter, fresher flavor. A classic combination includes heavy amounts of cinnamon, balanced by ground ginger, nutmeg, and a tiny pinch of cloves.
Do not skip the pure vanilla extract or the kosher salt, as both ingredients amplify the other flavors in the bowl. If you are experimenting with healthier baking alternatives, you might reference the low-sugar baker’s pantry to swap in alternative sweeteners. However, keep in mind that real sugar is vital for achieving that signature burnt caramel top.
For an unexpected twist, some bakers like to add a pinch of cardamom or black pepper to their spice mix. These savory additions cut through the heavy richness of the dairy. They add a sophisticated, bakery-level warmth that elevates the entire tasting experience.
Step-by-Step Baking Technique
Preparing Your Pan and Parchment
The iconic rustic aesthetic of this dessert begins with exactly how you line your baking pan. Take two large, overlapping sheets of parchment paper and aggressively crumple them up into tight balls in your hands. Flatten them back out and press them directly into your springform pan, letting the excess paper hang wildly over the sides.
Crumpling the paper breaks down its stiff fibers, making it much more pliable and easier to fit into the sharp corners of the pan. Those overlapping creases and folds will bake directly into the sides of your batter, creating its signature crinkled edge. Do not try to smooth it out or make it look neat; the messy appearance is entirely part of the charm.
Leaving at least two inches of parchment paper extending above the rim of the pan is non-negotiable. This batter will puff up dramatically in the oven, rising well above the top of the pan like a soufflé. The tall parchment collar prevents the expanding batter from spilling over onto your oven floor.
Mixing for Maximum Creaminess
When combining your ingredients, the primary goal is a perfectly smooth batter without incorporating excess air. Use a stand mixer fitted with a paddle attachment, or a hand mixer on a medium-low speed, to beat the cream cheese and sugar. Beating on too high a speed will whip unwanted air into the batter, causing it to rise and fall too drastically.
Add your room-temperature eggs one at a time, mixing just until the golden yolk disappears into the batter before adding the next. Stop your mixer to scrape down the sides and bottom of your bowl frequently with a flexible rubber spatula. This crucial step ensures no dense, unmixed pockets of cream cheese are left hiding at the bottom.
Once you add the heavy cream and the pumpkin puree, mix the batter only until it is uniformly combined. Overmixing at this final stage can break the emulsion, leading to a greasy texture. The final batter should look silky, thick, and vibrantly orange.
Nailing the High-Temperature Bake
To get that iconic, deeply caramelized top, your oven needs to be piping hot before the pan goes in. Most recipes require a baking temperature ranging from 400°F to 425°F (200°C to 220°C). Position your oven rack in the middle or slightly above the middle level to encourage maximum top browning.
The cake is ready to be pulled from the oven when the edges are visibly set and deeply browned, but the center still jiggles quite a bit. If you gently shake the pan, the middle should wobble back and forth like a bowl of loose gelatin. This usually takes between 45 and 55 minutes, highly depending on your specific oven’s calibration.
Do not panic if the top looks entirely too dark or even slightly blackened in spots. That intense caramelization is exactly what gives a pumpkin basque cheesecake its signature magic. It will deflate as it cools, transforming that puffed top into a gorgeous, wrinkled crater.
Serving and Storage Secrets
The Art of Chilling
Patience is truly the hardest part of creating this magnificent dessert. Once you pull the hot cake from the oven, it must cool completely in the pan on a wire rack. As it cools down to room temperature, the dramatically puffed center will sink and collapse inward, which is exactly what should happen.
After reaching room temperature, transfer the covered cake to the refrigerator for at least six hours, though chilling overnight is highly recommended. This essential resting period allows the rich custard to fully set and the complex autumnal spices to meld together. Attempting to slice into a warm basque cake will result in a messy, soupy puddle on your plate.
When you are finally ready to serve, pull the cake from the fridge about 20 minutes before slicing. Taking the chill off allows the cream cheese to soften just slightly. This brief resting period maximizes the silky, melt-in-your-mouth texture of the custard center.
Best Toppings and Pairings
Because this dessert is already incredibly rich, heavily spiced, and complex, it truly does not need much dressing up. A simple, rustic dollop of lightly sweetened, soft-whipped cream provides a lovely temperature and texture contrast. Some bakers like to fold a tiny splash of maple syrup into their whipped cream for extra autumn flair.
If you want to add a much-needed textural crunch, toasted pecans or candied pumpkin seeds make excellent, seasonal garnishes. A very light drizzle of salted caramel sauce also pairs beautifully with the bitter notes of the scorched crust. However, be careful not to drown the cake, as the pumpkin flavor should remain the star.
For beverage pairings, serve this rich slice alongside a piping hot cup of dark roast coffee or a spiced chai latte. The bitterness of the coffee cuts through the heavy dairy fat wonderfully. Alternatively, a small glass of tawny port or dessert wine makes for a highly sophisticated after-dinner treat.
How Long Will It Last?
Leftover cheesecake stores exceptionally well, making this a fantastic make-ahead dessert for Thanksgiving feasts or fall dinner parties. Keep the cake covered very tightly with plastic wrap or stored in an airtight container in the refrigerator. It will stay remarkably fresh and delicious for up to five full days.
Interestingly, many home bakers find that the flavors actually deepen and improve significantly on the second or third day in the fridge. The spices have more time to bloom and permeate the dense cream cheese base. This makes it the ultimate stress-free dessert for holiday entertaining.
You can also easily freeze individual slices wrapped tightly in a double layer of plastic wrap and aluminum foil for up to two months. Simply place a frozen slice in the refrigerator to thaw overnight whenever a craving strikes. The texture remains surprisingly perfect even after a stint in the freezer.
Pumpkin Basque Cheesecake vs Traditional Cheesecake
When deciding what to bake for your next autumn gathering, it helps to understand the key differences between these two iconic styles. While both are incredibly delicious, they offer completely different baking experiences, textures, and visual aesthetics. Traditional cheesecakes demand rigid precision, while basque versions enthusiastically thrive on beautiful imperfection.
Unlike intimidating culinary projects like when someone tried making beef wellington for the first time, this basque dessert is incredibly forgiving. You do not need professional pastry skills to execute it flawlessly. The lack of a crust and the intentional burning make it an entirely stress-free endeavor.
If you are struggling to choose between the two styles for your holiday table, consider the time you have available. The table below breaks down the major structural and procedural differences. This detailed comparison will help you understand why this rustic cake has become a modern baker’s best friend.
| Feature | Pumpkin Basque Cheesecake | Traditional Pumpkin Cheesecake |
|---|---|---|
| Crust | Crustless; the high heat forms a natural caramelized boundary. | Requires a pre-baked graham cracker, cookie, or pastry crust. |
| Baking Temperature | High heat (400°F – 425°F) for rapid exterior browning. | Low and slow heat (300°F – 325°F) to prevent surface cracking. |
| Water Bath Needed? | No. Bakes directly on the oven rack without any moisture control. | Yes. Requires boiling water in a roasting pan to ensure gentle cooking. |
| Internal Texture | Gooey, incredibly soft, custard-like center with firmer edges. | Dense, uniformly firm, and highly structured throughout. |
| Visual Appearance | Rustic, deeply browned or blackened top, sunken middle, crinkled edges. | Pristine, smooth pale top, perfectly flat surface, clean edges. |
| Difficulty Level | Beginner-friendly and highly forgiving of minor mistakes. | Intermediate to advanced; requires precise temperature management. |
Expert Tips for Flawless Results
Even though this style of dessert is inherently forgiving, a few professional kitchen tricks will take your bake from simply good to spectacular. Small details in temperature management and ingredient preparation make a world of difference. Keep these essential tips in mind before you start mixing your seasonal batter.
- Use Room Temperature Ingredients: Cold eggs and firm cream cheese will not emulsify properly, leaving you with an undesirable lumpy texture that disrupts the smooth mouthfeel.
- Heavy Cream is Essential: Do not attempt to substitute whole milk or half-and-half for the heavy whipping cream. The high dairy fat content is absolutely necessary to create that silky, rich custard center.
- Sift Your Dry Ingredients: Whisk your granulated sugar, spices, salt, and the tiny bit of flour together before adding them to the wet mix to completely prevent bitter spice clumps.
- Don’t Fear the Jiggle: The center should literally wobble like a bowl of unset jelly when you pull it from the hot oven. It will continue to carry-over cook and firm up as it cools on the counter.
- Let It Breathe Before Serving: Once out of the fridge, let your chilled slices sit at room temperature for 15-20 minutes before eating. This slightly softens the cheese for maximum creaminess.
- Wet the Parchment Paper: Lightly dampening the parchment paper under the faucet before crumpling it makes it adhere to the pan even better. This technique gives you sharp, dramatic, rustic edges.
- Tap Out the Bubbles: Before placing the pan in the oven, tap it firmly against the kitchen counter three or four times. This forces any trapped, large air bubbles to rise to the surface and pop.
- Use a Springform Pan: Because of the delicate, crustless nature of the cake, a pan with removable sides is mandatory. Trying to invert this soft dessert out of a standard cake pan will destroy it entirely.
Frequently Asked Questions about pumpkin basque cheesecake
Can I make this dessert gluten-free?
Yes, it is incredibly easy to adapt this recipe for a gluten-free diet. Simply swap the small amount of all-purpose flour for a 1:1 gluten-free baking blend or cornstarch. The flour is only there to bind the batter slightly, so the simple substitution works perfectly without altering the texture.
Why did my cheesecake not burn on top?
If your top is looking too pale at the end of the baking time, your oven temperature might run significantly cooler than the dial indicates. You can try moving the pan to a higher oven rack or briefly turning on the broiler for the last two minutes. Just watch it like a hawk to ensure it caramelizes beautifully rather than catching fire.
Do I really not need a crust for this recipe?
No crust is needed or desired for a traditional basque-style cake. The intense baking temperature actually caramelizes the exterior of the batter, creating a sturdy, natural crust-like boundary. This saves you the extra step and mess of making a traditional graham cracker base.
Can I use fresh roasted pumpkin instead of canned?
You can certainly use fresh roasted pumpkin, but you must drain it exceptionally well before using it. Fresh pumpkin holds significantly more water than canned puree, which can make your cream cheese batter far too thin. Puree it until completely smooth and squeeze out all excess liquid through a cheesecloth first.
What size pan is best for this recipe?
A standard 8-inch or 9-inch springform pan is ideal for this specific bake. An 8-inch pan will give you a dramatically taller cake with a creamier, softer center. A 9-inch pan will yield a slightly wider, firmer cake that bakes through a bit faster.
Why did my batter overflow in the oven?
This unique style of cheesecake rises dramatically during the baking process due to the rapid heat expansion. If your pan is too shallow or your parchment collar is too short, the batter may spill over the edges. Always leave at least an inch and a half of paper extending above the hard rim of your pan.
Is the burnt top going to taste like ash?
Despite the incredibly dark, sometimes blackened appearance, the top does not taste like ash or charcoal. It tastes like deeply toasted caramel, very similar to the torched sugar crust of a classic crème brûlée. The slight bitterness serves as the perfect foil for the sweet, creamy interior.
How do I slice the cake cleanly?
For bakery-style, pristine slices, you must use a large, very sharp chef’s knife. Run the knife blade under hot water and wipe it completely dry with a towel before making every individual cut. The residual heat helps the metal glide right through the dense cheese without sticking or tearing.
Can I bake this in a standard pie dish?
It is not recommended to bake this dessert in a standard, sloped pie dish. Pie dishes are simply not deep enough to handle the dramatic rise of the batter, leading to messy oven spills. You also cannot easily remove the delicate, crustless cake from a standard dish without destroying its beautiful shape.
Baking a stunning pumpkin basque cheesecake is one of the most rewarding culinary projects you can tackle this autumn season. By fully embracing the high heat and intentionally scorched exterior, you happily bypass all the fussy steps of traditional cheesecake baking. The result is a dramatically beautiful dessert packed with cozy spices and an impossibly creamy, custardy center. Whether you are hosting a massive holiday feast or simply treating yourself on a chilly weekend, this rustic cake is guaranteed to impress everyone at the table.
Now that you know the expert secrets to mastering this foolproof fall dessert, it is time to preheat your oven and get baking. Gather your cream cheese, open a can of pure puree, and do not be afraid to let that top get delightfully dark and caramelized. If you found this comprehensive guide helpful, be sure to share it with your fellow baking enthusiasts, and let us know how your delicious autumnal creation turned out in the comments below!
