Red velvet cake isn’t chocolate cake dyed red. It’s a mild-cocoa layer cake built on buttermilk and vinegar, and that acidic combination is the whole point. The small amount of cocoa, the tang of cultured buttermilk, and a splash of vinegar create a soft, fine crumb with a faint cocoa note and a slight sourness that the cream cheese frosting answers perfectly. According to USDA FoodData Central, buttermilk carries a pH of roughly 4.4 to 4.8, acidic enough to tenderize gluten and react with baking soda. ([USDA FoodData Central](https://fdc.nal.usda.gov), 2023) Get the acid balance right and you get the velvet.
Key Takeaways
- Red velvet is a mild-cocoa cake, not a chocolate one. The cocoa, buttermilk, and vinegar build a tangy, tender crumb.
- Buttermilk sits at about pH 4.4 to 4.8, acidic enough to react with baking soda and soften the crumb. ([USDA FoodData Central](https://fdc.nal.usda.gov), 2023)
- Room-temperature butter, eggs, and buttermilk emulsify properly and bake into an even, fine texture.
- Don’t overbake. Pull the layers at 30 to 35 minutes, when a tester shows a few moist crumbs.
- Cream cheese frosting balances the cake’s sweetness with tang. Serves 12 to 16 slices.
What Makes Red Velvet Cake Actually Red Velvet?
Red velvet earns its name from texture first and color second. The “velvet” refers to the soft, plush crumb that acidic batters produce, and the original red came from a chemical reaction, not a bottle. Natural cocoa contains anthocyanins, pigments that turn reddish in acidic conditions. According to food historians at the Smithsonian, early bakers got a rusty red tint from cocoa reacting with buttermilk and vinegar, long before bottled dye existed. ([Smithsonian Magazine](https://www.smithsonianmag.com), 2014)
Three ingredients do the heavy lifting: cocoa, buttermilk, and vinegar. The cocoa is small in quantity, usually a couple of tablespoons, so the flavor stays faint rather than fudgy. The buttermilk and vinegar bring acidity. That acidity tenderizes gluten, reacts with baking soda for lift, and gives the cake its signature gentle tang.
Modern cocoa is mostly Dutch-processed, which is alkaline and won’t turn red on its own. That’s why today’s recipes lean on red food coloring for the dramatic color. The flavor and texture, though, still come from the same acidic chemistry the original bakers relied on.
Cocoa, Buttermilk, and Vinegar: The Reaction
Here’s the simple version. Baking soda is a base. Buttermilk and vinegar are acids. Combine them and you get carbon dioxide bubbles, which lift the batter. The acid also weakens gluten strands, so the crumb stays tender instead of chewy. Skip the buttermilk and the cake loses both its rise and its softness.
What Ingredients Do You Need for Red Velvet Cake?
Red velvet uses pantry staples plus a few specifics that matter. The non-negotiables are real buttermilk, natural or regular cocoa powder, white vinegar, and full-fat cream cheese for the frosting. Using whole, cultured buttermilk rather than a milk-and-lemon substitute gives the most reliable acidity and the cleanest tang. America’s Test Kitchen notes that genuine cultured buttermilk produces a more tender, consistent crumb than homemade acidified milk. ([America’s Test Kitchen](https://www.americastestkitchen.com), 2022)
For the Cake
- 2½ cups (300g) all-purpose flour
- 2 tablespoons unsweetened cocoa powder
- 1 teaspoon baking soda
- 1 teaspoon salt
- 1½ cups (300g) granulated sugar
- 1 cup (240ml) vegetable oil
- 2 large eggs, room temperature
- 1 cup (240ml) buttermilk, room temperature
- 2 tablespoons red food coloring (gel preferred)
- 1 teaspoon vanilla extract
- 1 teaspoon white vinegar
For the Cream Cheese Frosting
- 16 oz (450g) full-fat cream cheese, room temperature
- ½ cup (115g) unsalted butter, room temperature
- 4 cups (480g) powdered sugar, sifted
- 1 teaspoon vanilla extract
- Pinch of salt
One detail to take seriously: everything should be at room temperature. Cold butter won’t cream properly, cold eggs can break an emulsion, and cold cream cheese makes lumpy frosting. Pull these from the fridge an hour before you start. It’s the cheapest insurance for a smooth batter and a glossy frosting.
How Do You Make the Red Velvet Batter?
The red velvet batter is forgiving as long as you respect the mixing order and the timing. Because baking soda reacts with the buttermilk and vinegar the moment they meet, you want the batter in the oven without long delays. Serious Eats explains that acidic batters lose lift if they sit, since the soda has already started releasing carbon dioxide. ([Serious Eats](https://www.seriouseats.com), 2021) Mix efficiently, then bake.
Mixing Steps
- Prep your pans and oven. Preheat to 350°F (175°C). Grease and line two 8-inch round pans with parchment.
- Whisk the dry ingredients. Combine flour, cocoa powder, baking soda, and salt in a bowl. Whisk well so the cocoa and soda distribute evenly.
- Combine the wet ingredients. In a large bowl, whisk sugar and oil. Add eggs one at a time, then the buttermilk, red coloring, and vanilla. The mixture should look uniform and deeply red.
- Bring them together. Add the dry ingredients to the wet in two or three additions, mixing just until no streaks of flour remain. Don’t overmix; that builds gluten and toughens the crumb.
- Add the vinegar last. Stir in the teaspoon of white vinegar at the very end. You’ll see a faint fizz as it hits the baking soda. Fold gently, just two or three turns.
- Divide and bake right away. Split the batter between the two pans and get them into the oven without delay.
A quick note on color. Gel food coloring gives a deeper red with less liquid than the watery bottled kind. If you’d rather avoid artificial dye, a couple of tablespoons of beet powder will give a more muted, natural red. The flavor stays the same either way.
Why Shouldn’t You Overbake Red Velvet Cake?
Overbaking is the single most common way red velvet goes wrong. The cake’s reputation rests on a moist, tender crumb, and a few extra minutes in the oven dries it out fast. Oil-based cakes like this one stay moist longer than butter cakes, but they still suffer from overbaking. The USDA notes that baked goods continue cooking from residual heat after leaving the oven, so pulling them a touch early is smart. ([USDA Food Safety and Inspection Service](https://www.fsis.usda.gov), 2023)
Start checking at 30 minutes. The layers are done when a toothpick inserted in the center comes out with a few moist crumbs clinging to it, not wet batter and not bone dry. The edges should just begin to pull away from the pan. Most 8-inch layers finish between 30 and 35 minutes.
Let the layers cool in their pans for 10 minutes, then turn them onto a wire rack to cool completely. Frosting a warm cake is a guaranteed mess; the cream cheese frosting will slide right off. Cool layers, ideally chilled for 20 minutes, hold the frosting and slice cleanly.
How Do You Make the Cream Cheese Frosting?
Cream cheese frosting is what separates red velvet from an ordinary layer cake. Its tang plays directly off the cake’s mild sweetness and faint cocoa. The key is full-fat block cream cheese, never the spreadable tub kind, which contains stabilizers and extra water that make frosting runny. According to America’s Test Kitchen, full-fat block cream cheese produces a thicker, more stable frosting that holds its shape on a layer cake. ([America’s Test Kitchen](https://www.americastestkitchen.com), 2022)
Frosting Steps
- Cream the butter and cheese. Beat room-temperature butter and cream cheese together until smooth and lump-free, about 2 minutes.
- Add the sugar gradually. Add the sifted powdered sugar one cup at a time on low speed, so it doesn’t fly out of the bowl. Scrape down the sides between additions.
- Finish with vanilla and salt. Beat in the vanilla and a pinch of salt. The salt cuts sweetness and sharpens the tang.
- Don’t overbeat. Once smooth and spreadable, stop. Overbeating warms the cream cheese and thins the frosting.
- Chill if needed. If the frosting feels soft, refrigerate it for 15 to 20 minutes before spreading.
If your frosting turns out too loose, the usual culprit is warm cream cheese or low-fat cream cheese. Chill the bowl, then beat in a little more sifted powdered sugar a quarter cup at a time until it firms up.
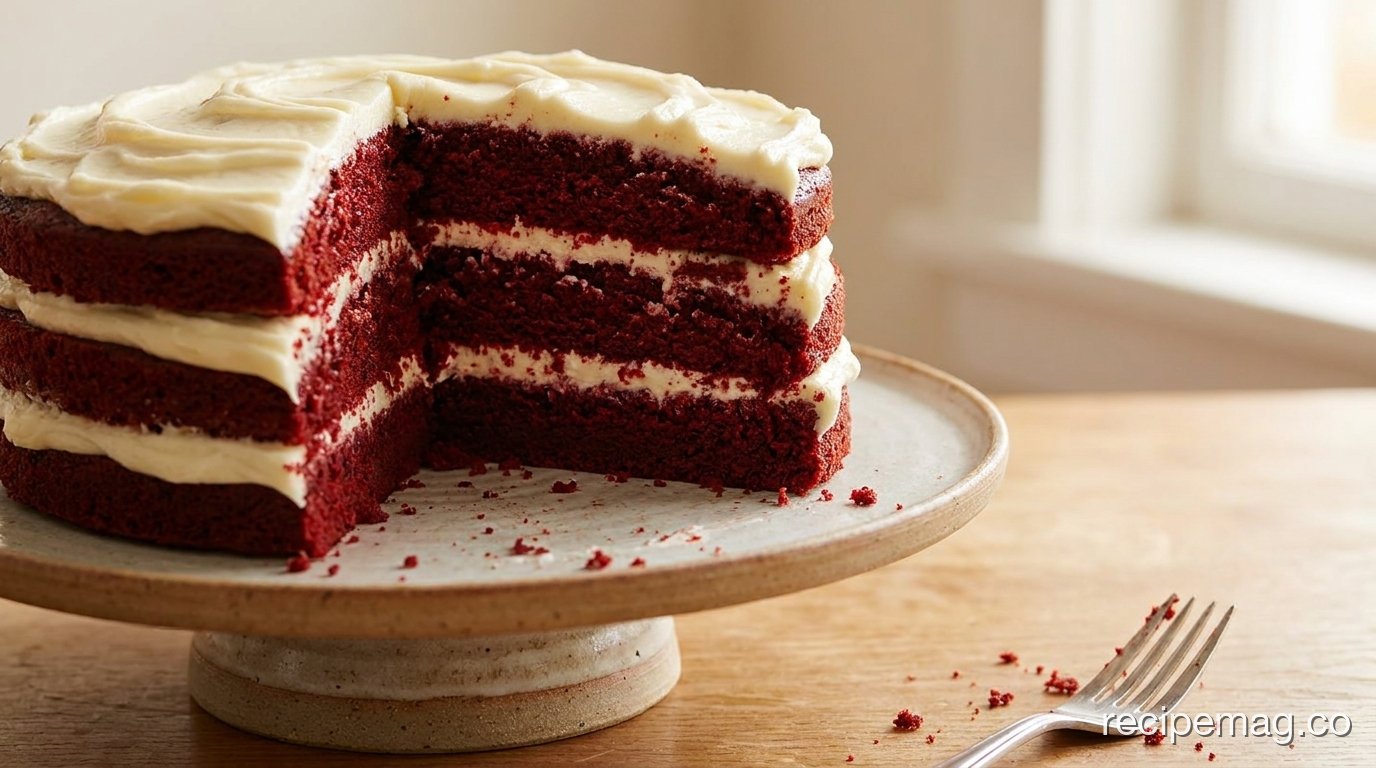
How Do You Assemble the Cake?
Assembly is where a good cake becomes a beautiful one. The classic finish is a fully frosted two-layer cake, sometimes dusted with red velvet crumbs from a trimmed dome. A 2020 study in the journal Appetite found that careful plating and presentation raised taste ratings by up to 29% for the same food. ([Appetite, Elsevier](https://www.journals.elsevier.com/appetite), 2020) A few minutes of neat assembly genuinely makes the cake taste better.
Assembly Steps
- Level the layers. If the tops domed, trim them flat with a serrated knife. Save the trimmings to crumble over the top later.
- Frost the first layer. Place one layer cut-side up on a stand. Spread an even cup of frosting across the top to the edges.
- Stack and frost. Set the second layer on top, cut-side down for a flat surface. Frost the top, then the sides.
- Smooth or swirl. Use an offset spatula to smooth the frosting, or leave rustic swirls. Either looks classic.
- Garnish. Press reserved red velvet crumbs around the top edge or over the whole cake for the signature look.
Chill the assembled cake for 30 minutes before slicing. A cold cake gives clean, defined slices and keeps the cream cheese frosting firm. Wipe your knife between cuts for tidy red-and-white layers.
—
Classic Red Velvet Cake with Cream Cheese Frosting
Prep Time: 25 minutes | Cook Time: 33 minutes | Serves: 12 to 16
Ingredients
Cake
- 2½ cups (300g) all-purpose flour
- 2 tablespoons unsweetened cocoa powder
- 1 teaspoon baking soda
- 1 teaspoon salt
- 1½ cups (300g) granulated sugar
- 1 cup (240ml) vegetable oil
- 2 large eggs, room temperature
- 1 cup (240ml) buttermilk, room temperature
- 2 tablespoons red food coloring (gel preferred)
- 1 teaspoon vanilla extract
- 1 teaspoon white vinegar
Cream Cheese Frosting
- 16 oz (450g) full-fat cream cheese, room temperature
- ½ cup (115g) unsalted butter, room temperature
- 4 cups (480g) powdered sugar, sifted
- 1 teaspoon vanilla extract
- Pinch of salt
Instructions
- Preheat oven to 350°F (175°C). Grease and line two 8-inch round pans with parchment.
- Whisk flour, cocoa, baking soda, and salt in a bowl.
- In a large bowl, whisk sugar and oil. Beat in eggs one at a time, then buttermilk, red coloring, and vanilla until uniform.
- Add the dry ingredients in two or three additions, mixing just until no flour streaks remain. Do not overmix.
- Stir in the vinegar at the end with two or three gentle folds. Divide batter between the pans immediately.
- Bake 30 to 35 minutes, until a tester shows a few moist crumbs. Cool in pans 10 minutes, then turn out onto a rack to cool completely.
- Make the frosting: beat cream cheese and butter until smooth. Add powdered sugar one cup at a time on low speed. Beat in vanilla and salt. Chill 15 minutes if soft.
- Level layers, frost between and around, then garnish with reserved crumbs. Chill 30 minutes before slicing.
Notes
- Room-temperature eggs, buttermilk, butter, and cream cheese are essential for a smooth batter and frosting.
- Don’t overbake. Pull the layers when a tester shows a few moist crumbs, usually 30 to 35 minutes.
- Use full-fat block cream cheese, not the spreadable tub, for a frosting that holds its shape.
- Store the frosted cake covered in the fridge for up to 4 days. Bring to room temperature 30 minutes before serving.
—
Frequently Asked Questions About Red Velvet Cake
Is red velvet cake just chocolate cake with food coloring?
No. Red velvet uses only a couple of tablespoons of cocoa, far less than chocolate cake, so the chocolate flavor stays faint. The defining feature is the tang from buttermilk and vinegar and the soft “velvet” crumb that acidic batter produces. The red color is a finishing touch, not the substance. The cake’s identity comes from its texture and gentle sourness, not from chocolate.
Can I make red velvet cake without buttermilk?
You can substitute, but real buttermilk works best. In a pinch, stir 1 tablespoon of white vinegar or lemon juice into 1 cup of whole milk and let it sit 5 minutes to curdle. Genuine cultured buttermilk gives more reliable acidity and a more tender crumb, according to America’s Test Kitchen. ([America’s Test Kitchen](https://www.americastestkitchen.com), 2022) The acidity matters because it reacts with the baking soda.
Why did my red velvet cake turn out dry?
Overbaking is almost always the cause. Red velvet should be moist and tender, and even a few extra minutes dries it out. Start checking at 30 minutes and pull the layers when a tester shows a few moist crumbs, not clean and not wet. Measuring flour by weight rather than scooping also prevents a dry, dense cake from too much flour.
Can I use natural food coloring instead of red dye?
Yes. Beet powder or beet juice gives a softer, more natural red, though the shade is muted compared to gel dye. Use about 2 to 3 tablespoons of beet powder in the batter. The flavor stays mild and the color deepens slightly after baking. Pure cocoa with acidic buttermilk also lends a faint reddish-brown tone, which is how the original cakes got their color.
How should I store red velvet cake?
Because of the cream cheese frosting, store it in the refrigerator. Cover the cake or place it in an airtight container and keep it for up to 4 days. The USDA recommends refrigerating dairy-based frostings to keep them safe. ([USDA Food Safety and Inspection Service](https://www.fsis.usda.gov), 2023) Let slices sit at room temperature for about 30 minutes before serving so the crumb softens and the flavor opens up.
Red velvet rewards a baker who understands what it actually is. It’s not a chocolate cake in disguise. It’s a tangy, tender, mild-cocoa cake whose soft crumb comes from the quiet chemistry of buttermilk, vinegar, and a little cocoa. Treat the acid with respect and pull the layers before they dry out.
This cake also carries meaning beyond the kitchen. Red foods feature prominently in Juneteenth celebrations, where red dishes honor heritage and resilience, and red velvet cake has long held a place on those tables. Baking one in June connects a simple dessert to a deeper tradition.
Make it ahead if you can. A red velvet cake assembled the day before and chilled overnight slices cleaner and tastes even better, the flavors settling into that signature balance of sweet cake and tangy frosting.
