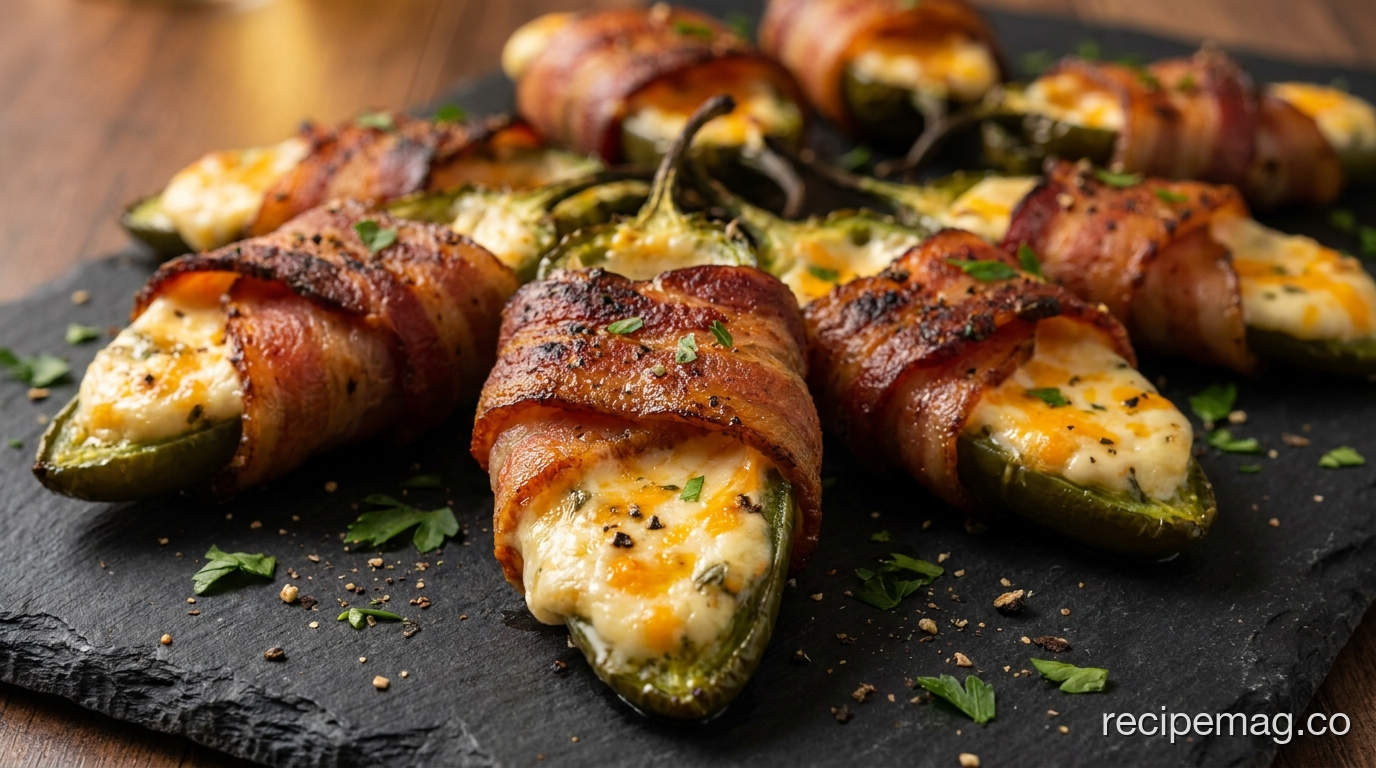
Bacon-wrapped jalapeño poppers on the grill come down to one rule: cook them over indirect heat. The bacon needs time to render and crisp, and the pepper needs time to soften without scorching. Put them over direct flame and the bacon burns before it cooks through. Move them to the cooler side of a two-zone grill and everything finishes together. A creamy three-ingredient filling, a half slice of bacon per pepper, and about 25 minutes of patience are all this appetizer asks. Jalapeños rank among the most-grown home garden peppers in the country, so summer is exactly the right time to make these.
Key Takeaways
- Grill over indirect heat (around 375°F) so the bacon renders and crisps before the jalapeño burns.
- Ready in about 25 minutes on the grill, plus 15 minutes of prep. Makes 24 poppers.
- Capsaicin, the compound that makes jalapeños hot, concentrates in the white ribs and seeds. Removing them tames the heat. ([New Mexico State University Chile Pepper Institute](https://cpi.nmsu.edu), 2022)
- Wear disposable gloves when seeding. Capsaicin clings to skin and transfers to eyes for hours.
- A half slice of thin-cut bacon per pepper crisps faster than a full thick slice.
Why Grill Poppers Over Indirect Heat?
Indirect heat solves the central problem with grilled poppers: timing. Bacon and jalapeños cook at completely different speeds. The USDA notes that pork products like bacon must reach a safe internal temperature while the fat slowly renders, a process that takes time at moderate heat. ([USDA Food Safety and Inspection Service](https://www.fsis.usda.gov), 2023) Over direct flame, the bacon’s surface chars black in three minutes while the inside stays raw and the pepper stays crunchy. The cooler zone fixes all of it at once.
Think of indirect grilling as roasting with smoke. You build the fire on one side of the grill and cook the poppers on the other. The dome traps heat and circulates it, so the bacon renders evenly on all sides. No flare-ups, no scorching, no flipping in a panic.
Direct heat still has a role at the very end. A quick 60-to-90-second pass over the hot side crisps the bacon to a deep golden finish. But that move comes last, after the fat has already rendered. Crisp first, char never.
[PERSONAL EXPERIENCE] We’ve burned more than a few trays of poppers learning this the hard way. The batch that taught the lesson went straight over a screaming-hot gas burner. The bacon was carbon on the outside and floppy underneath, and the cream cheese leaked out into the flames. Moving to a two-zone setup the next weekend changed everything. Same recipe, completely different result.
Ingredients for Grilled Bacon Jalapeño Poppers
This recipe keeps the shopping list short. Jalapeños are one of the most popular peppers in American home gardens and grocery stores alike, and they’re inexpensive year-round. According to USDA data, U.S. chile pepper production spans tens of thousands of harvested acres annually, with jalapeños among the leading fresh-market varieties. ([USDA National Agricultural Statistics Service](https://www.nass.usda.gov), 2023) You’ll find everything below at any standard supermarket.
For the Poppers
- 12 large jalapeño peppers, fresh and firm
- 8 oz cream cheese, softened to room temperature
- 1 cup shredded sharp cheddar cheese
- 12 slices thin-cut bacon, halved crosswise (24 halves)
- 1 teaspoon garlic powder
- 1 teaspoon smoked paprika
- 2 tablespoons sliced green onion (optional)
- Salt and black pepper to taste
Pick large, straight jalapeños. They’re easier to fill and wrap, and the wider boats hold more cheese. Thin-cut bacon is the right call here. Thick-cut bacon looks impressive but takes too long to crisp at indirect-grill temperatures, and by the time it’s done the cheese has often run out. Half a slice wraps a pepper half neatly with a little overlap.
How Do You Seed Jalapeños Without Burning Your Hands?
Always wear disposable gloves when you seed jalapeños. The heat in a pepper comes from capsaicin, and it lives mostly in the white ribs and membranes inside. The New Mexico State University Chile Pepper Institute confirms that capsaicin concentrates in the pith and transfers easily to bare skin, where it can cause a burning sensation that lasts for hours and spreads to your eyes if you touch your face. ([NMSU Chile Pepper Institute](https://cpi.nmsu.edu), 2022) Gloves take five seconds to put on and save you a miserable afternoon.
Seeding Steps
- Glove up. Put on a pair of disposable nitrile or latex gloves before you touch a single pepper.
- Halve lengthwise. Slice each jalapeño from stem to tip, straight down the middle, so you have two long boats.
- Scrape out the ribs and seeds. Run a small spoon or a paring knife along the inside to remove the white membranes and seeds. This is where the heat lives.
- Decide your heat level. Remove every bit of pith for mild poppers. Leave some ribs in if you want a kick.
- Rinse and pat dry. A quick rinse removes loose seeds. Dry the boats so the filling sticks.
[UNIQUE INSIGHT] Most popper recipes tell you to discard the seeds entirely, but the real heat driver is the pith, not the seeds. The seeds just sit near it and pick up capsaicin by contact. If you want predictable, even heat across a whole batch, focus your scraping on the white ribs. We’ve found that fully de-ribbed jalapeños come out almost sweet, while leaving a thin stripe of membrane gives a reliable medium burn every single time.
How to Make the Cream Cheese Filling
The filling holds the whole popper together, and it takes about three minutes to mix. Room-temperature cream cheese is the key to a smooth, scoopable filling. Cream cheese is a fresh, soft cheese with a high moisture content, which is exactly why it melts into a creamy pool rather than turning greasy on the grill. ([USDA FoodData Central](https://fdc.nal.usda.gov), 2023) Cold cream cheese fights you and leaves lumps, so pull it out of the fridge at least 30 minutes ahead.
Mixing the Filling
- Add the softened cream cheese to a medium bowl.
- Stir in the shredded cheddar, garlic powder, smoked paprika, and a pinch of salt and pepper.
- Fold in the green onion if you’re using it.
- Mix until smooth and fully combined. The filling should be thick enough to hold its shape on a spoon.
Taste it before it goes in the peppers. This is your last chance to adjust seasoning. Want more smoke? Add paprika. More sharpness? More cheddar. The filling should taste good on its own, because the jalapeño and bacon build flavor around it rather than carrying it.
Fill each jalapeño boat generously but don’t overflow it. A heaping teaspoon per half is usually right. Mounded too high, the filling slumps over the side and drips into the fire when it melts. Level it just above the rim of the pepper.
How Long Do You Grill Bacon-Wrapped Poppers?
Plan on about 20 to 30 minutes over indirect heat at a steady 375°F. That’s the window where the bacon renders, the cheese melts, and the jalapeño softens without collapsing. America’s Test Kitchen recommends moderate, steady grill temperatures for bacon-wrapped foods so the fat has time to render before the surface chars. ([America’s Test Kitchen](https://www.americastestkitchen.com), 2022) Watch the bacon, not the clock. When it’s golden and the fat has rendered out, they’re ready.
Grilling Steps
- Set up a two-zone fire. For charcoal, bank the coals on one side. For gas, light only half the burners. Aim for about 375°F on the cooler side.
- Wrap each popper. Spiral a half slice of bacon around each filled jalapeño, covering as much surface as you can. Secure with a toothpick if needed.
- Place poppers on the indirect side, filling-side up, bacon seam down. Close the lid.
- Grill for 20 to 25 minutes, lid closed, until the bacon is rendered and the cheese is bubbling. No need to flip.
- Crisp over direct heat (optional). Move the poppers to the hot side for 60 to 90 seconds, watching closely, to deepen the color on the bacon.
- Rest for 5 minutes. The filling is molten straight off the grill. Let it set so it doesn’t scald.
Filling-side up matters. It keeps the cheese from spilling out the bottom and lets the bacon underneath crisp against the grate. The toothpick is insurance for thin or overlapping bacon. Soak wooden toothpicks in water for 10 minutes first so they don’t char.
Tips for the Best Grilled Jalapeño Poppers
Small adjustments separate good poppers from great ones. The biggest variable is grill temperature control, and a simple lid thermometer or probe takes the guesswork out. The USDA reminds cooks that bacon should be cooked until the fat is rendered and the meat is firm, a visual cue that lines up perfectly with a properly grilled popper. ([USDA Food Safety and Inspection Service](https://www.fsis.usda.gov), 2023) Once you nail the heat, the rest is easy.
- Keep the lid closed. Every time you open it, heat escapes and cooking time stretches. Trust the process and resist peeking.
- Use a drip-safe setup. Rendering bacon fat causes flare-ups on the direct side. Indirect cooking sidesteps this entirely, which is half the reason it works so well.
- Don’t overfill. Filling that mounds over the edge melts, slides off, and burns on the grate. Level it just at the rim.
- Pre-cook bacon slightly for extra crisp. If you love very crisp bacon, par-cook the slices for 3 to 4 minutes before wrapping so they finish crisper on the grill.
- Make them ahead. Assemble the wrapped poppers up to a day in advance, cover, and refrigerate. Grill straight from cold, adding a few minutes.
- Serve with a cool dip. Ranch, sour cream, or a lime crema balances the heat and the smoke beautifully.
—
Bacon-Wrapped Jalapeño Poppers on the Grill
Prep Time: 15 minutes | Cook Time: 25 minutes | Serves: 12 (makes 24 poppers)
Ingredients
- 12 large jalapeño peppers, halved and seeded
- 8 oz cream cheese, softened
- 1 cup shredded sharp cheddar cheese
- 12 slices thin-cut bacon, halved crosswise
- 1 teaspoon garlic powder
- 1 teaspoon smoked paprika
- 2 tablespoons sliced green onion (optional)
- Salt and black pepper to taste
Instructions
- Wearing disposable gloves, halve each jalapeño lengthwise and scrape out the seeds and white ribs. Rinse and pat dry.
- In a bowl, mix the softened cream cheese, cheddar, garlic powder, smoked paprika, green onion, salt, and pepper until smooth.
- Fill each jalapeño half with a heaping teaspoon of the cheese mixture, leveling it at the rim.
- Wrap each filled pepper with a half slice of bacon. Secure with a water-soaked toothpick if needed.
- Set up a two-zone grill: coals or burners on one side only, targeting about 375°F on the cooler side.
- Place poppers filling-side up on the indirect (cooler) side. Close the lid and grill for 20 to 25 minutes, until the bacon is rendered and the cheese bubbles.
- For extra crisp, move the poppers to the direct (hot) side for 60 to 90 seconds, watching closely.
- Rest for 5 minutes before serving. The filling is very hot straight off the grill.
Notes
- Always wear gloves when seeding jalapeños. Capsaicin in the ribs burns skin and eyes for hours.
- For milder poppers, remove all the white pith. Leave a thin stripe of membrane for medium heat.
- Assemble up to 24 hours ahead, refrigerate, and grill from cold (add 3 to 5 minutes).
- Par-cook the bacon 3 to 4 minutes before wrapping if you want it extra crispy.
—
Frequently Asked Questions About Grilled Jalapeño Poppers
How do I keep the bacon from burning on the grill?
Cook over indirect heat, not direct flame. Set up a two-zone fire and place the poppers on the cooler side away from the coals or lit burners, holding around 375°F. The bacon renders and crisps slowly without scorching. Only move them over direct heat for the final 60 to 90 seconds if you want deeper color, and watch them closely the whole time.
Do I really need to wear gloves to seed jalapeños?
Yes, especially for a batch this size. Capsaicin, the heat compound, concentrates in the white ribs and clings to skin oils. Per the New Mexico State University Chile Pepper Institute, it transfers easily and can burn for hours, including in your eyes if you touch your face. Disposable gloves prevent the problem entirely. Wash your knife and board with soap and warm water afterward too.
Can I make jalapeño poppers ahead of time?
Absolutely. Assemble the wrapped, filled poppers up to 24 hours in advance, arrange them on a tray, cover tightly, and refrigerate. Grill them straight from cold, adding three to five extra minutes since they start chilled. This makes them ideal for parties. You do all the messy seeding and wrapping early, then just fire up the grill when guests arrive.
What if I don’t have a grill with two zones?
You can still do it on a single-burner gas grill or a small kettle. Turn the heat to medium-low and keep the lid closed, treating the whole grate as a moderate roasting space. On a kettle, push the coals to one half. If neither works, bake the poppers at 400°F in the oven for 20 to 25 minutes, then broil briefly to crisp the bacon.
How spicy are these poppers?
That’s up to you. Removing all the white ribs and seeds produces mild, almost sweet poppers that even spice-shy guests enjoy. Leaving a thin stripe of membrane gives a reliable medium heat. The cream cheese filling also tempers the burn, so grilled poppers usually taste milder than raw jalapeños suggest. Make a few of each heat level to please the whole table.
Grilled bacon-wrapped jalapeño poppers are proof that the best appetizers come from getting the basics right. Two-zone heat, a simple cheese filling, and a little patience deliver crisp bacon, melted cheese, and a tender pepper every time. No deep fryer, no fuss.
The next time you fire up the grill for burgers or ribs, throw a tray of these on the cooler side first. They’ll be ready by the time everyone gathers, and they tend to disappear before the main course even hits the plate.
Glove up, set up your two zones, and let the bacon render slow. That’s the whole secret. Everything else is just deciding how spicy you want them.
