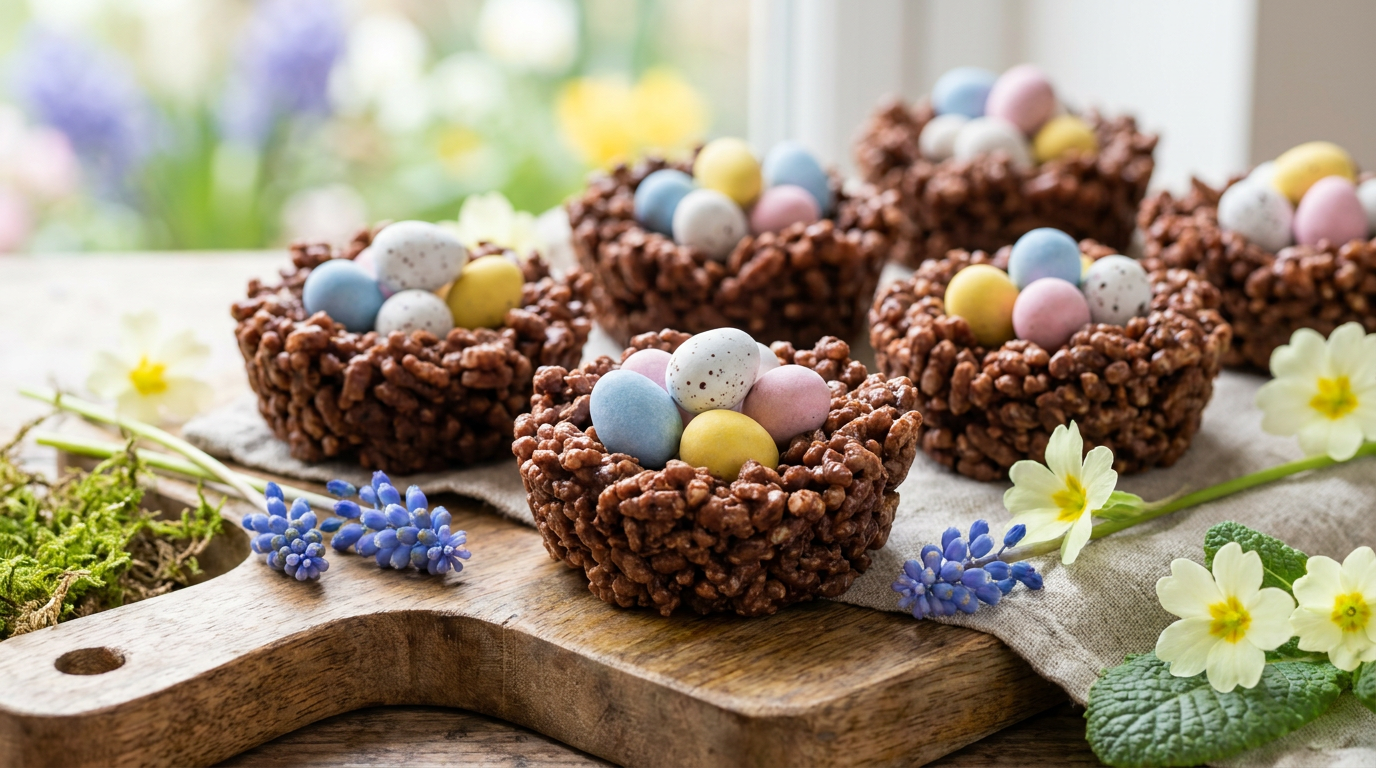

Spring is in the air, bringing with it pastel colors, warmer weather, and the perfect excuse to whip up adorable festive desserts. If you want a treat that looks impressive but takes minimal effort, making chocolate easter egg nests is the ultimate solution. These beautiful, crunchy bites capture the essence of the season without requiring you to turn on the oven.
While many holiday desserts require complicated piping or hours of baking, this simple no-bake recipe is completely stress-free. It combines rich, melted dark chocolate with toasted sliced almonds and bright green pistachios. This creates a sophisticated, gourmet flavor profile that appeals to both children and adults.
Whether you are hosting an impressive Easter brunch or just want a fun weekend project, these festive treats always steal the show. In this comprehensive guide, you will learn exactly how to craft the perfect edible nests. We will cover the best ingredient combinations, foolproof chocolate melting techniques, and pro tips to guarantee your treats look straight out of a boutique bakery.
Why You Will Love These Edible Bird Nests
When the spring holidays arrive, our schedules quickly fill up with family gatherings, egg hunts, and meal prep. Having a reliable, lightning-fast dessert recipe in your arsenal is a lifesaver. These edible nests deliver maximum visual impact with truly minimal hands-on time.
Traditional nest recipes often rely on overly sweet marshmallows and dry cereal. By upgrading to premium nuts and high-quality chocolate, you instantly elevate this nostalgic treat into a true culinary delight. It is the perfect balance of playful presentation and grown-up flavors.
A Perfect No-Bake Spring Dessert
The beauty of this recipe lies in its sheer simplicity. From start to finish, you can prep a full batch in under 20 minutes before letting the refrigerator do the rest of the work. You never have to worry about preheating an oven or monitoring baking times.
This makes the recipe an incredible activity to share with younger family members. Kids love stirring the chocolate-coated nuts and carefully placing the colorful candy eggs into the center of each nest. It is a messy, joyful, and completely safe kitchen project.

Gourmet Flavor Profile
Many classic holiday treats lean heavily on pure sugar, which can lead to palate fatigue. This upgraded recipe focuses on a beautiful balance of flavors and textures. The deep, slightly bitter notes of dark chocolate perfectly offset the sweetness of the candy egg centerpieces.
Furthermore, adding a pinch of flaky sea salt transforms the entire flavor experience. The salt enhances the cocoa notes and brings out the natural earthiness of the toasted almonds and pistachios. Every bite delivers a satisfying crunch followed by a smooth, melting chocolate finish.
Essential Ingredients for the Perfect Crunch
Crafting the best chocolate easter egg nests requires selecting the right foundation. While the recipe is highly adaptable, using premium base ingredients makes a noticeable difference in the final product. Let us break down the core components needed for success.
Because there are only a handful of ingredients in this no-bake dessert, the quality of each item shines through. Opting for fresh nuts and good-quality chocolate will elevate your nests from an average snack to a memorable dessert.
Choosing the Right Chocolate
Your choice of chocolate dictates the structure and flavor of the entire nest. High-quality chocolate baking bars generally melt much smoother than standard chocolate chips. Chocolate chips contain stabilizers designed to help them hold their shape under heat, which can make them thicker when melted.
For the best flavor balance, a semi-sweet or dark chocolate in the 60% to 70% cacao range is highly recommended. If you are baking for a crowd with a sweet tooth, a blend of half milk chocolate and half dark chocolate creates a crowd-pleasing hybrid. Avoid using pure white chocolate as the base, as it tends to be temperamental when melting.
Nuts and Textural Add-Ins
Sliced almonds are the undisputed champion for creating realistic-looking edible twigs. Their flat, elongated shape mimics the appearance of a real bird’s nest beautifully. Toasting them lightly in a dry skillet beforehand amplifies their nutty flavor significantly.
Chopped pistachios serve a dual purpose in this recipe. Not only do they add a buttery, distinct flavor, but their vibrant green color looks like little flecks of spring moss woven into the nest. Together, these two nuts create a hearty, satisfying crunch.
Selecting Your Candy Eggs
The candy eggs are the crowning jewel of your chocolate easter egg nests. Miniature Cadbury chocolate eggs are a fan favorite due to their delicious chocolate center and beautiful matte pastel shells. Their crunchy sugar coating contrasts wonderfully with the smooth nest base.
Alternatively, you can use candy-coated peanut butter eggs, colorful jelly beans, or even speckled malted milk eggs. If you are preparing a laid-back Mother’s Day meal later in the season, you can swap the eggs for edible sugar flowers or fresh berries.

Step-by-Step Guide to Crafting Edible Nests
Creating these treats is an exercise in efficient assembly. Before you begin melting the chocolate, ensure all your ingredients are measured and your workstations are prepped. Line a large baking sheet with parchment paper or silicone baking mats.
Having a muffin tin on hand is also incredibly helpful if you want perfectly uniform nests. Simply line a 12-cup muffin tin with paper liners or lightly grease a silicone muffin pan. This helps the nests hold a tight circular shape as the chocolate sets.
Preparing the Nut Mixture
Begin by measuring out your sliced almonds and roughly chopping your shelled pistachios. If you purchased raw almonds, spread them on a baking sheet and toast them at 350°F (175°C) for about 5-7 minutes. Watch them closely, as nuts can go from toasted to burnt in seconds.
Allow the toasted nuts to cool completely before mixing them with the chocolate. If you mix hot nuts into melted chocolate, the residual heat can cause the chocolate to bloom or lose its temper. Toss the cooled nuts together in a large mixing bowl with a pinch of flaky sea salt.
Melting the Chocolate Smoothly
The safest way to melt chocolate without burning it is by using a double boiler. Place a heatproof bowl over a saucepan of simmering water, ensuring the bottom of the bowl does not touch the water. Stir gently until the chocolate is completely smooth and glossy.
If you prefer the microwave method, place your chopped chocolate in a microwave-safe bowl. Heat it on 50% power in 30-second increments, stirring thoroughly after each interval. Patience is key here; stirring helps distribute the heat and prevents the chocolate from seizing.
Shaping the Individual Nests
Pour the warm, melted chocolate over your bowl of mixed nuts. Use a flexible silicone spatula to gently fold the mixture until every single almond slice is completely coated. Work relatively quickly so the chocolate does not begin to set in the bowl.
Spoon roughly two tablespoons of the mixture onto your prepared parchment paper or into your muffin tin liners. Use the back of a spoon to press a shallow indentation into the center of each mound. Immediately place three candy eggs into the indentation while the chocolate is still wet, so they stick firmly as it cools.
Creative Variations and Dietary Swaps
One of the greatest appeals of chocolate easter egg nests is their incredible versatility. You can easily modify the base ingredients to accommodate food allergies or utilize whatever happens to be in your pantry. The ratio of base ingredient to melted chocolate remains roughly the same across most variations.
Experimenting with different textures can yield surprisingly delicious results. Whether you want a saltier profile or a chewier texture, there is a variation to suit every preference. Below are some popular ways to customize your spring desserts.
Making Them Nut-Free
If you need a nut-free alternative for school events or allergy concerns, there are plenty of excellent options. Dry chow mein noodles are the classic retro choice, offering a great salty crunch that looks incredibly realistic. Pretzel sticks broken into small pieces work wonderfully too.
For a lighter, sweeter option, toasted shredded coconut makes a beautiful, fluffy nest. You can even mix toasted coconut with crispy rice cereal or cornflakes. Just ensure whatever base you choose is completely dry before adding the melted chocolate.
Vegan and Dairy-Free Alternatives
Transforming this recipe into a vegan-friendly treat is remarkably simple. The primary swap is ensuring your chocolate is certified dairy-free. Many high-quality dark chocolate bars and specialized vegan chocolate chips work perfectly for melting.
When selecting your decorations, remember that traditional milk chocolate candy eggs contain dairy. Swap these out for vegan jelly beans, fresh blueberries, or dark chocolate-covered espresso beans. The visual effect will remain just as stunning.
Fun Twists for the Candy Toppings
Pastel candy eggs are the traditional choice, but you are not limited to them. Try using peanut butter candies, yogurt-covered raisins, or colorful Jordan almonds. For a completely different aesthetic, add a dollop of marshmallow fluff in the center to look like a resting bird.
You can also play with the chocolate drizzle. Once your nests have set, use a fork to flick melted white chocolate over the tops. This creates a beautiful, rustic speckled effect that adds an extra layer of professional polish to your presentation.
Comparing Nest Base Ingredients
Choosing the right base ingredient changes both the flavor profile and the visual appeal of your nests. Use this comparison table to decide which base matches your desired texture and dietary needs.
| Base Ingredient | Texture Profile | Visual Appearance | Dietary Notes |
|---|---|---|---|
| Sliced Almonds & Pistachios | Hearty, gourmet crunch, buttery finish | Elegant, realistic flat twigs with mossy green flecks | Gluten-Free, Contains Tree Nuts |
| Chow Mein Noodles | Crispy, slightly salty, airy crunch | Highly realistic, mimics authentic round twigs | Contains Gluten, Nut-Free |
| Pretzel Sticks | Hard crunch, prominent salty-sweet flavor | Thick, rustic wooden branches | Contains Gluten, Nut-Free (GF pretzels available) |
| Toasted Coconut | Chewy with a delicate, light crispness | Soft, woven, fluffy bird’s nest | Gluten-Free, Nut-Free (FDA classifies as tree nut, but often tolerated) |
| Cornflakes | Light, shattering crunch, sweeter profile | Abstract, leafy autumn-style nest | Often Gluten-Free (check labels), Nut-Free |
Pro Tips for Flawless Spring Desserts
Even the simplest recipes benefit from a few insider tricks. If you want your chocolate easter egg nests to turn out perfectly every single time, keep these professional baking guidelines in mind. A little extra attention to detail goes a long way.
- Never skip the salt: A tiny pinch of flaky sea salt (like Maldon) sprinkled on top right before the chocolate sets balances the intense sweetness of the candy eggs.
- Chill for speed: While the nests will set at room temperature in about an hour, you can speed up the process by popping the baking tray into the refrigerator for 15-20 minutes.
- Use a cookie scoop: For perfectly uniform portions, use a medium spring-loaded cookie scoop to transfer the sticky chocolate mixture from the bowl to your tray.
- Mind your kitchen temperature: If your kitchen is very warm, the chocolate will take much longer to set. Keep them away from sunny windows or hot stoves.
- Do not crush the nuts: Fold the mixture gently with a silicone spatula. Vigorously stirring with a wooden spoon will break the delicate almond slices into a messy paste.
Frequently Asked Questions about chocolate easter egg nests
How long do these treats take to set?
If left at room temperature in a cool kitchen, the chocolate will completely solidify in about 45 to 60 minutes. To accelerate the process, place the tray in the refrigerator where they will set in just 15 to 20 minutes.
Can I freeze these edible nests?
Yes, chocolate easter egg nests freeze exceptionally well. Place the fully set nests in an airtight, freezer-safe container with parchment paper between layers. They can be frozen for up to two months; just let them thaw at room temperature before serving.
What is the best chocolate to use?
High-quality chocolate baking bars in the 60% to 70% dark chocolate range yield the best results. They melt smoothly and provide a rich flavor that balances the sweet candy toppings. Avoid candy melts if you want a gourmet taste.
Do I have to use almonds and pistachios?
Not at all. While almonds and pistachios offer a gourmet flavor profile, you can easily substitute them. Chow mein noodles, shredded coconut, or crushed pretzels all make fantastic, crunchy bases for these nests.
How should I store leftover nests?
Store your fully set nests in an airtight container at room temperature for up to one week. If your home is particularly warm, keep the container in the refrigerator to prevent the chocolate from softening or melting.
Can I make these without a microwave?
Absolutely. The traditional and highly recommended way to melt chocolate is using a double boiler on the stovetop. Simply place a heatproof bowl over a pot of simmering water, ensuring the water does not touch the bowl, and stir until smooth.
What kind of candy eggs work best?
Miniature chocolate eggs with a hard candy shell, like Cadbury Mini Eggs, are the most popular choice for both looks and taste. However, jelly beans, chocolate-covered almonds, or peanut butter eggs work wonderfully as well.
Why did my chocolate seize?
Chocolate seizes and becomes a grainy, thick paste if it comes into contact with even a tiny drop of water. It can also seize if it is overheated in the microwave. Always make sure your bowls and utensils are completely dry before starting.
Are these treats gluten-free?
Yes, if you make your chocolate easter egg nests using nuts, coconut, or certified gluten-free pretzels, they are naturally gluten-free. Always double-check your chocolate and candy egg labels to ensure there is no cross-contamination during manufacturing.
Wrapping Up Your Spring Baking
Making homemade chocolate easter egg nests is one of the most rewarding and stress-free ways to celebrate the spring season. By combining premium dark chocolate, toasted nuts, and vibrant candy eggs, you transform a simple no-bake concept into a show-stopping dessert. They are the perfect addition to any springtime celebration, offering a delightful crunch and rich flavor that everyone will love.
Now that you know the secrets to perfecting this easy recipe, it is time to get into the kitchen and start melting some chocolate. Grab your favorite nuts, pick out some colorful pastel eggs, and enjoy the process of crafting these beautiful edible nests. If you try this recipe, be sure to share your creations with friends and family—they are guaranteed to disappear quickly!
