The secret to how to cook the perfect steak is mostly about heat and timing, not fancy equipment. Salt the steak ahead, dry it well, sear it hard in a hot pan or over hot coals, and pull it from the heat a few degrees before your target doneness. The USDA recommends a safe minimum internal temperature of 145°F for whole cuts of beef, with a three-minute rest (USDA FSIS, 2023). A reliable thermometer matters more than any cookbook.
Key Takeaways
- Dry-brine with salt at least 40 minutes ahead, or up to 24 hours, for deeper seasoning and a better crust.
- A bone-dry surface is what lets the Maillard reaction build that brown, savory sear above roughly 300°F.
- Pull the steak 5°F below your target: medium-rare lands at 130-135°F per America’s Test Kitchen. ([America’s Test Kitchen](https://www.americastestkitchen.com), 2023)
- Rest the steak 5-10 minutes so the juices redistribute instead of running out onto the board.
- An instant-read thermometer beats guesswork every single time.
How Do You Choose the Right Steak Cut?
The cut sets the ceiling for how good your steak can be. Marbling, the thin threads of fat inside the muscle, is the single biggest driver of flavor and tenderness, which is why the USDA grades beef as Prime, Choice, and Select based largely on it (USDA Agricultural Marketing Service, 2023). For a quick, hot sear at home, pick a tender, well-marbled cut and you’ve already won half the battle.
Best Cuts for a Quick Sear
- Ribeye. The most forgiving choice. Heavy marbling keeps it juicy even if you slightly overshoot your target temperature. Dad’s favorite for a reason.
- New York strip. Leaner than ribeye, with a firmer chew and a clean, beefy flavor. A great everyday steak.
- Filet mignon. The most tender cut, but mild in flavor. Wrap it in a little fat or finish with butter to make up for the leanness.
- Sirloin. Affordable and flavorful. Less tender, so don’t push it past medium.
Why Thickness Matters
Aim for a steak at least 1 to 1.5 inches thick. A thick steak gives you the margin to build a deep crust on the outside while the center reaches your target slowly. Thin steaks overcook in the middle before the surface browns. If your butcher counter only sells thin cuts, ask them to cut a thicker one for you. It’s the easiest upgrade you can make.
Why Should You Salt and Dry the Steak First?
Salting early is the highest-impact thing you can do before the pan ever gets hot. Salt pulls moisture to the surface, dissolves, then gets reabsorbed, seasoning the meat all the way through, a technique cooks call dry-brining, and Serious Eats recommends doing it at least 40 minutes ahead or up to overnight (Serious Eats, 2023). The bonus: that resting time also dries the surface, which is exactly what you need for a great crust.
The Dry-Brine Method
- Pat the steak dry with paper towels straight out of the package.
- Salt generously on all sides with coarse kosher salt. About 3/4 teaspoon per pound is a good guide.
- Rest it uncovered on a rack in the fridge. Forty minutes works; overnight is better. The surface should look dry, almost tacky.
- Dry it again right before cooking. A bone-dry surface is non-negotiable for a hard sear.
Wait on the pepper. Black pepper can scorch and turn bitter over very high heat, so many cooks add it after the sear or during the rest. Salt early, pepper late. That small adjustment keeps the crust clean and the flavor sharp.
How Do You Get a Perfect Sear?
The crust is where flavor lives, and it comes from the Maillard reaction, the browning chemistry between proteins and sugars that kicks in fast above about 300°F (Harvard T.H. Chan School of Public Health, 2023). To get there, you need two things: a screaming-hot cooking surface and a steak that’s bone dry. Skip either one and you’ll steam the meat gray instead of browning it.
Searing in a Cast-Iron Pan
- Heat the pan until it’s almost smoking. Cast iron holds heat better than anything else in your kitchen. Give it several minutes.
- Add a high-smoke-point oil. Use avocado, grapeseed, or refined canola. Save butter for later; it burns at high heat.
- Lay the steak away from you and don’t move it. Let it sit for 2 to 3 minutes until a deep brown crust forms.
- Flip once and sear the second side another 2 to 3 minutes. Sear the edges too, holding the steak upright with tongs.
Searing on the Grill
For charcoal or gas, build a two-zone fire: one side blazing hot, one side cooler. Sear over the hot side to build the crust, then slide the steak to the cooler side to finish gently to temperature. This is the grilling version of sear-then-coast, and it gives you control that a single-temperature grill never will.
What Internal Temperature Means Each Doneness Level?
Doneness is a number, not a guess, and a thermometer makes it foolproof. America’s Test Kitchen pegs medium-rare at a final internal temperature of 130-135°F and recommends pulling the steak about 5°F early to account for carryover cooking (America’s Test Kitchen, 2023). For food safety, the USDA sets 145°F with a 3-minute rest as the minimum for whole cuts (USDA FSIS, 2023).
| Doneness | Pull Temp | Final Temp | What It Looks Like |
|---|---|---|---|
| Rare | 120°F | 120-125°F | Cool red center, very soft |
| Medium-rare | 125-130°F | 130-135°F | Warm red center, juicy |
| Medium | 135°F | 140-145°F | Warm pink center, firmer |
| Medium-well | 145°F | 150-155°F | Slight pink, mostly brown |
| Well-done | 155°F+ | 160°F+ | No pink, firm throughout |
Insert the thermometer into the thickest part, away from bone or fat, for an accurate read. Bone and fat conduct heat differently and will throw the number off. If you cook steak more than a few times a year, an instant-read thermometer pays for itself fast.
Why Does Resting the Steak Matter?
Resting is the step people skip and then wonder why their steak bled juice all over the cutting board. When meat cooks, the heat pushes moisture toward the cooler center, and resting gives those juices time to redistribute evenly, so they stay in the steak instead of pouring out the moment you slice (Serious Eats, 2023). Five to ten minutes is enough for most steaks. Tent it loosely with foil to keep it warm.
Resting also finishes the cooking. Carryover heat keeps climbing during the rest, which is exactly why you pulled the steak early. A medium-rare steak pulled at 128°F will drift up into the low 130s on the board. Cut into it too soon and you lose both the juice and the few degrees the rest would have added.
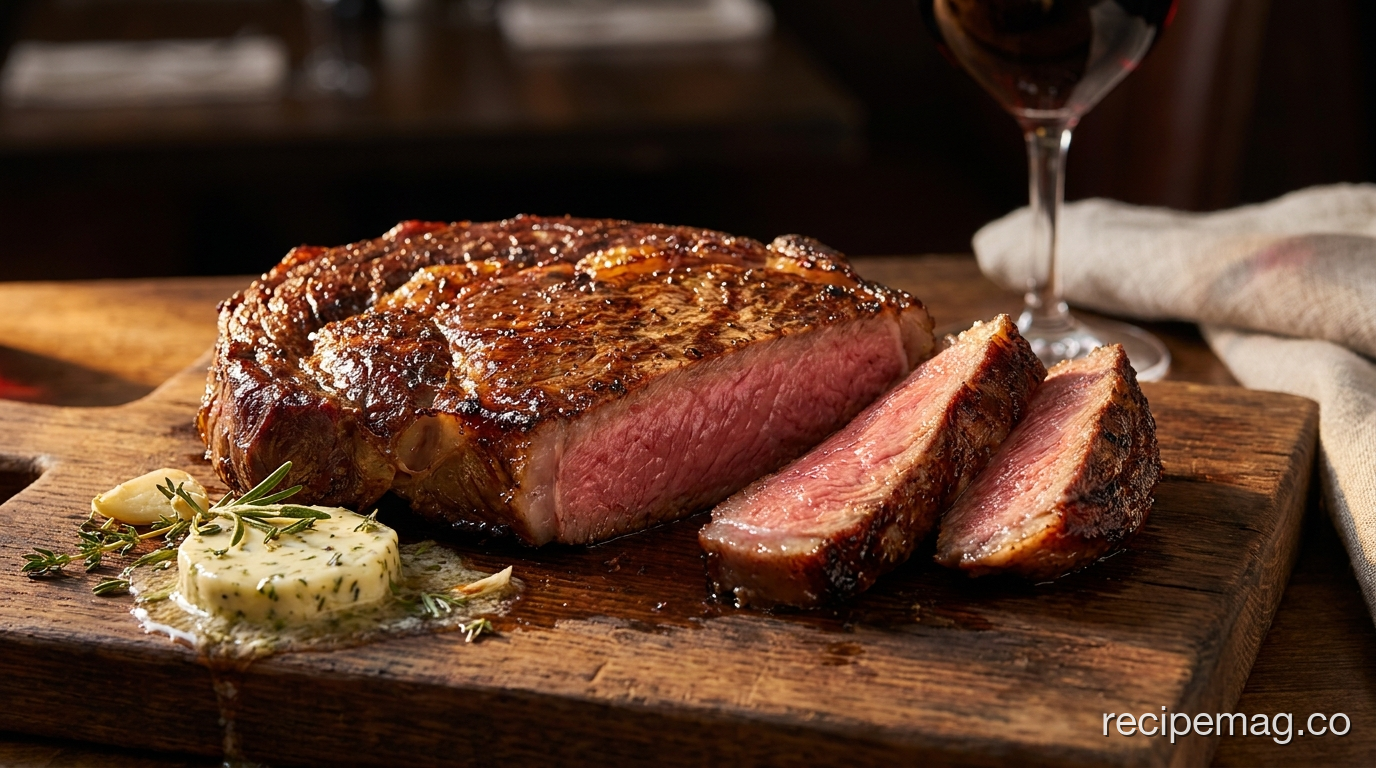
How Do You Butter-Baste a Steak?
Butter-basting is the restaurant trick that turns a good steak into a great one, and it takes about a minute. Once the steak is seared, you drop butter, garlic, and herbs into the pan and spoon the foaming, aromatic fat over the meat. The butter carries flavor into the crust and helps the surface brown evenly. Because butter’s milk solids burn above roughly 350°F, you add it only at the end, after the hard sear is done (Serious Eats, 2023).
The Basting Steps
- Sear first, then turn the heat down to medium once both sides have a crust.
- Add 2 tablespoons butter, a couple of crushed garlic cloves, and a few sprigs of thyme or rosemary.
- Tilt the pan so the melted butter pools at the lower edge.
- Spoon the foaming butter over the steak continuously for 30 to 60 seconds. This is also when you can finish bringing it to temperature.
What Are the Most Common Steak Mistakes?
Most steak failures come from a handful of avoidable habits, and fixing them costs nothing. The biggest one is cooking cold steak in a cool pan, which steams the surface gray instead of searing it. Roughly that simple lesson, dry surface plus high heat, explains why home steaks so often disappoint. Here’s what to stop doing.
Mistakes to Avoid
- Skipping the salt-ahead step. Salting at the last second seasons only the surface and leaves a wet exterior that won’t crust.
- A pan that isn’t hot enough. If the steak doesn’t sizzle aggressively the moment it lands, the pan is too cool. Wait longer.
- Flipping constantly. Let each side sit undisturbed to build a crust. One confident flip beats ten nervous ones.
- Guessing the doneness. The poke test is unreliable. Use a thermometer and pull early.
- Cutting in immediately. No rest means lost juice. Wait the five minutes.
- Slicing with the grain. Always slice across the grain to shorten the muscle fibers and keep every bite tender.
Frequently Asked Questions About How to Cook the Perfect Steak
Should I cook steak straight from the fridge or let it come to room temperature?
Letting a steak sit at room temperature for 20 to 30 minutes helps it cook more evenly, but the effect is smaller than most people think. A thick steak’s center barely warms in that window. The far more important step is drying the surface thoroughly. For food safety, the USDA advises against leaving meat out longer than two hours total (USDA FSIS, 2023).
What’s the safe internal temperature for steak?
The USDA recommends a minimum internal temperature of 145°F for whole cuts of beef, followed by a 3-minute rest (USDA FSIS, 2023). That corresponds to medium doneness. Many people enjoy steak at medium-rare, around 130-135°F final; if you cook below 145°F, you accept a small added food-safety risk, which most home cooks do knowingly with whole, intact cuts.
Can I cook a perfect steak without a cast-iron pan?
Yes. Any heavy, oven-safe pan that holds heat well will sear a steak, including stainless steel and carbon steel. The key is mass and high heat, not the specific material. Avoid nonstick pans for steak; they can’t safely reach the temperatures needed for a good crust, and the high heat damages the coating over time.
How do I know when to flip the steak?
Flip when the first side has a deep brown crust and releases cleanly from the pan. A steak that’s properly seared will stop sticking on its own; if it grips the pan when you try to lift it, give it another 30 seconds. For a 1.5-inch steak in a hot pan, that’s usually 2 to 3 minutes per side before the basting stage.
Why is my steak tough even when cooked to medium-rare?
Toughness usually comes from the cut or the slicing, not the temperature. Leaner cuts like sirloin and flank have more connective tissue and chew firmer than ribeye. Always slice across the grain to shorten the muscle fibers. And don’t skip the rest: cutting in early lets juice escape, which makes any steak feel dry and tough.
Fire Up the Pan This Weekend
Cooking a great steak isn’t about luck or a secret ingredient. It’s a short, repeatable sequence: salt early, dry the surface, sear hard, pull at the right temperature, and rest. Get those five steps right and you’ll out-cook most restaurants, at a fraction of the price.
Start with a thick, well-marbled cut and a thermometer you trust. Those two purchases do more for your results than any gadget or marinade. Everything else is timing, and timing comes quickly with practice.
This is Dad’s favorite for good reason. Make it for him, make it for yourself, and the next time someone asks how you nailed it, you’ll have a real answer instead of a shrug.
